
In this guide
- Why built-in lighting so often looks cheap
- Where the light should go, unit by unit
- Strips, profiles and grooves: the numbers
- Colour temperature, CRI and brightness
- Drivers, voltage drop, heat and service access
- Control: one channel per unit, on a keypad and in scenes
- The checklist to settle before carpentry starts
- How Pert delivers it (designed, not DIY)
- FAQs
This article is part of our wider coverage of home automation in Hyderabad. Built-in lighting is the one lighting layer that belongs as much to the carpenter as to the electrician. It only works when the joinery drawing, the lighting drawing and the control plan agree with each other.
Why built-in lighting so often looks cheap
Four failures account for nearly every disappointing crockery unit or bookshelf we are asked to fix.
- Visible dots. A basic SMD strip has LEDs every 10–17mm. Stuck directly onto a shelf with no profile, each chip shows as a separate bright spot, and a lacquered or glass shelf reflects it a second time.
- A visible source. The strip is fixed on the underside of the shelf, flush with the front edge, so anyone standing in the room looks straight into it. Instead of seeing lit objects, you see a bright line.
- An unreachable driver. The transformer is pushed into the carcass and closed in behind a glued back panel. When it fails, and drivers are the part most likely to fail, the only way in is to break the unit.
- An orphan switch. A small rocker is fitted inside the cabinet or on its side, separate from everything else in the room. It is never part of an evening scene, it is left on all night, and eventually nobody bothers with it at all.
All four are decided before a single board is cut. After that, each one is expensive to put right.
Where the light should go, unit by unit
The principle is simple: light the objects, not the eye. The source should sit where it lights what is on the shelf but cannot be seen from normal eye level, which is roughly 1.1–1.2 metres seated and 1.5–1.6 metres standing. There are four placements, and each unit type suits a different one.
- Front-edge downlighting. A profile under each shelf, set back 20–30mm from the front edge, aimed down and slightly back. This is the default for open shelves and bookshelves. It lights the fronts of objects and book spines, and the shelf lip hides the source. For shelves above eye level, fit the profile on the top of the shelf below instead, aimed upward and hidden behind a 15–20mm upstand.
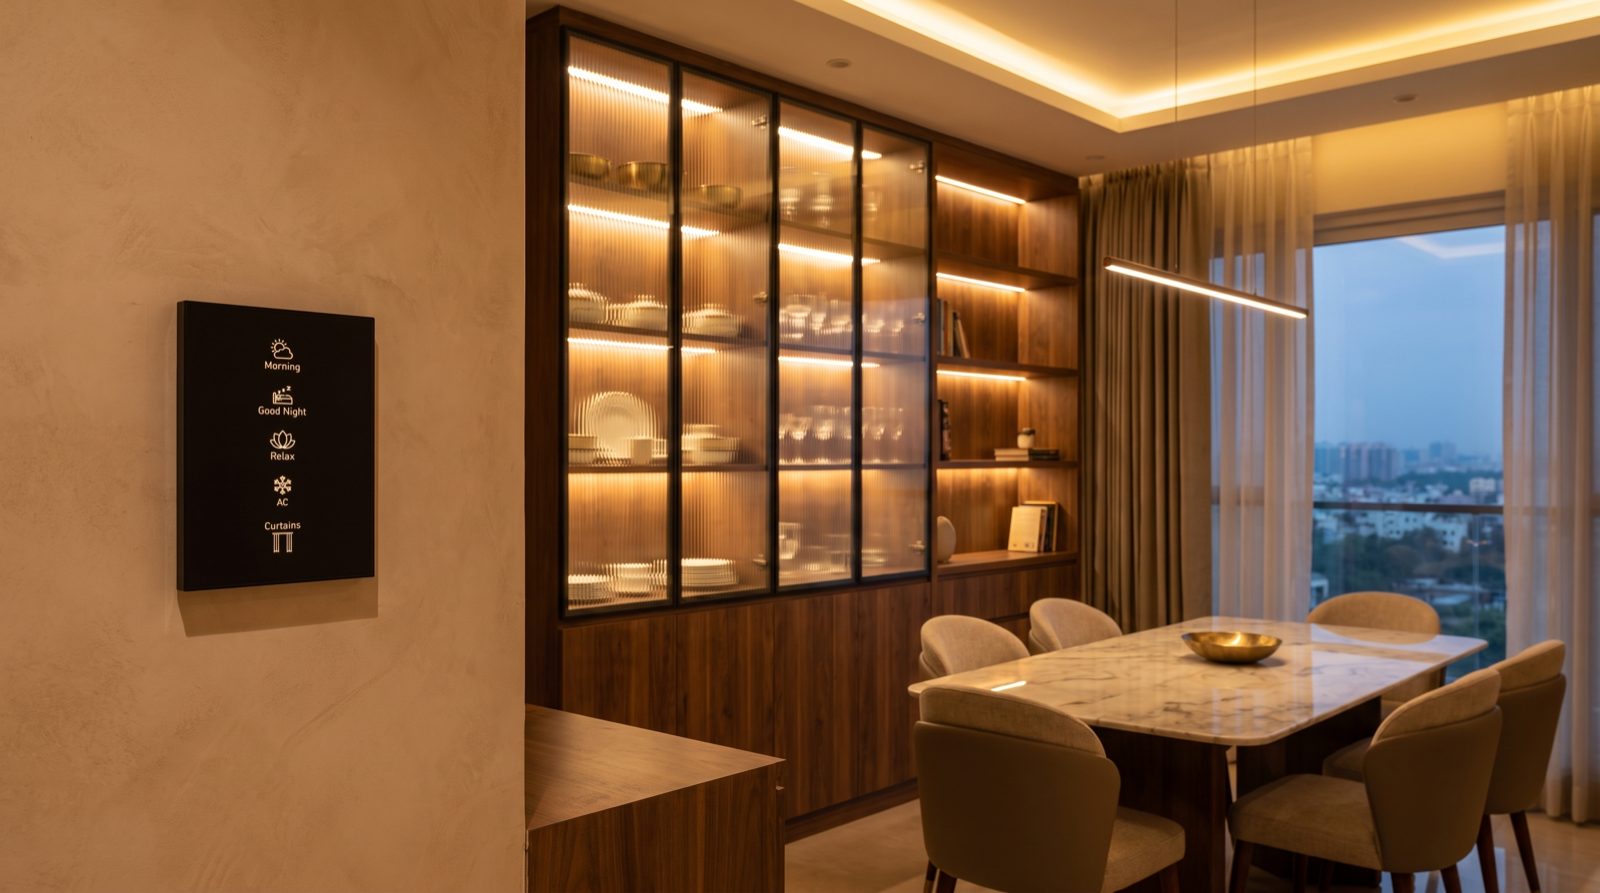
- Vertical side channels. Profiles recessed into the left and right side panels of each bay, running the full height. This is the best choice for glass-shelved crockery and bar units: the light passes through the glass shelves instead of being blocked by them, crystal and glassware sparkle, and no shelf casts a hard shadow on the one below.
- Back wash. A strip along the back edge, or a backlit fluted-glass or onyx back panel, which shows objects as silhouettes. It is dramatic in a display niche or behind a bar, but it lights the fronts of objects poorly. Treat it as a mood layer, not the only light.
- Puck spots. Small 1–3W recessed spots in the top of a cabinet or under a shelf, for one object that deserves emphasis, such as a sculpture, a brass lamp or a heritage piece. Choose a narrow beam (24–36°) and a deep anti-glare recess, and never put one directly above a glass shelf, because it will throw a bright ring onto the objects below.
Applied to the units in a typical Hyderabad home:
- Crockery unit with glass doors: vertical side channels, plus a single top profile if the unit is deeper than about 400mm. Check the view through the glass doors from the dining chairs, because a horizontal line reflected in a door is the most common complaint we hear.
- Open bookshelf: front-edge profiles on every shelf, or on alternate shelves on a tight budget, with a warm, even output so the spines read without glare off glossy covers.
- Display niche in a TV wall or foyer: one top profile or a pair of vertical channels, often with a back wash. For niches on a TV wall, keep the light out of the screen's reflection zone, as covered in TV wall lighting and automation.
- Bar unit: vertical channels through glass shelves, a back wash behind the bottles, and under-counter light on the work surface.
Wardrobes and closets follow different rules, because they are opened rather than displayed. We cover those in wardrobe and walk-in closet lighting. For accent lighting on walls and artwork outside the joinery, see wall washing and accent lighting.
Strips, profiles and grooves: the numbers
This is the section to hand to the carpenter, because every figure here becomes a cut in the board.
- Use COB strip, not open-spaced SMD. A COB (chip-on-board) strip packs 320–512 chips per metre under a continuous phosphor coat, so it reads as one line even close to the surface. It is the single biggest improvement over a basic strip, and it is what Pert specifies in built-in joinery as part of our smart lighting range.
- Always use an aluminium profile with an opal diffuser. The profile is also the heat sink. The diffuser hides the remaining texture of the strip and protects it from dust and cleaning cloths.
- Recessed groove size. For a typical slim recessed profile, the groove is about 10–12mm wide and 8–10mm deep, routed before the shelf is edge-banded. Check the exact profile before cutting, because a groove 1mm too narrow means the profile will not seat, and one 2mm too wide leaves a visible gap.
- Shelf thickness. An 18mm shelf takes a recessed groove comfortably. A 12mm glass-look or thin shelf cannot, so either plan a surface-mounted profile hidden behind a lip or switch to vertical side channels.
- Cable path. Drill an 8–10mm grommeted hole at the end of each groove and run the cable in the 15–20mm service gap behind the back panel. Leave this gap in the carcass design, because cables stapled across the back of a shelf are visible through glass.
- Corners and joins. Plan runs to end cleanly at the side panels. Joins in the middle of a visible shelf are hard to make invisible, and a soldered join inside a sealed groove is a future fault.
Colour temperature, CRI and brightness
Built-in lighting is seen at close range, against the rest of the room, and usually at night, so small mismatches show.
- Colour temperature: 2700–3000K for most homes, matched to the room's cove and ambient lighting. A 4000K strip in a crockery unit next to a 2700K cove looks clinical and obviously wrong. If the room uses tunable lighting, either use tunable strip in the unit too or fix it at the warm end. Our colour temperature guide sets the room-by-room targets.
- CRI 90 or above. Wood grain, brass, silver, porcelain glaze and book spines are exactly what poor colour rendering flattens. For display lighting, CRI 80 is a false economy. The specifications to check on a datasheet are explained in LED light specs explained.
- Output for enclosed shelves and glass cabinets: 4.8–6 W/m, roughly 400–600 lumens per metre. Inside a small glass box this is plenty, and brighter strips glare off the glass.
- Output for feature niches and open bookshelves: 9.6–10 W/m, roughly 900–1,000 lumens per metre, so the unit still reads from across the room when the ambient light is up.
- Always dimmable. The brightness that looks right with the room at full brightness is too much at 10 in the evening. A unit that cannot dim will be switched off, and then it is not doing its job.
Drivers, voltage drop, heat and service access
The strip is what you see. The driver decides whether the unit still works in five years.
- Use 24V, not 12V, for anything but the shortest runs. At 12V, a strip run of more than about 2–3 metres visibly dims and shifts colour towards the far end. At 24V the practical run is about 5 metres from a single feed. Beyond that, feed from both ends or run a parallel supply to the midpoint.
- Size the driver at about 80% load. Add up the metres × watts per metre, then multiply by 1.25. For example, 8 metres at 6 W/m is 48W, so specify a 60W driver. A driver running at 100% runs hot and dies young.
- Choose the dimming method with the control system. A constant-voltage driver has to be dimmable and compatible with whatever channel drives it, whether that is trailing-edge phase dimming, 0–10V or DALI. Mismatches are the classic cause of shimmer at low levels, which is covered in why LED lights flicker when dimmed.
- Mind the heat inside closed glass cabinets. Keep strip output at or below about 10 W/m inside a sealed cabinet, always in an aluminium profile. Put the driver outside the display compartment, because a driver in a closed glass box heats the air and everything on the shelves.
- Make the driver reachable. The usual locations are behind a removable pelmet on top of the unit, in the plinth void behind a clip-on kick board, or in an adjacent service cabinet with a ventilated back. Mark the location on the joinery drawing. Never close a driver in behind a glued panel or laminate.
When several units in the same room share a driver or a channel, the load has to be planned alongside the room's other lighting circuits. How to plan dimmer channels and lighting loads sets out the grouping rules.
Control: one channel per unit, on a keypad and in scenes
The most common control mistake is too many switches: one per shelf, one per bay, hidden inside the unit. Nobody wants to operate the bookshelf one shelf at a time.
- One dimmable channel per unit is the default. Split into two channels only when there is a real reason, such as a back wash that should run separately from the shelf lights, or a bar counter that needs task light while the display stays low.
- Bring it onto the wall. On a Pert Stella wall keypad, the unit can have its own engraved button, such as Display or Shelves, or it can simply be included in the room's scenes. Engrave the button for what it does, not for the carpenter's name for the unit. Our guide to keypad layouts and engraving covers the naming.
- Put it into scenes with real levels. For a dining room, typical starting points are Dinner: crockery unit at 60%; Evening: 40%; Movie in an open-plan living area: 10–15% as a low background glow that reduces contrast around the screen; Good Night and Away: off. We fine-tune these in the finished room at night. Designing home automation scenes shows how a full scene is put together.
- Use door contacts only for storage. A cabinet that is opened rather than looked at, such as a pantry pull-out, bar storage or an under-counter drawer, is better on a small door-contact switch than on a scene. Display units should never depend on a door being opened.
- Consider it for Away mode. A softly lit display unit on a schedule while the family is away helps the house look occupied. It can sit alongside the rest of the home security set-up and motorised curtains in an Away routine.
The checklist to settle before carpentry starts
Built-in lighting is decided in the week the joinery drawings are approved. Take this list to that meeting.
- Placement per unit marked on the joinery drawing: front-edge, vertical channel, back wash or puck, with the view checked from the dining chairs and sofa.
- Groove sizes and positions for the actual profile chosen, routed before edge-banding.
- A 15–20mm service gap behind the back panel and grommeted cable holes at the end of each run.
- Driver location marked, ventilated and reachable: a removable pelmet, plinth or service cabinet.
- A 3-core supply point and automation cable at each unit, with a 300mm tail at the top or plinth where the driver will sit, left by the electrician before the carpenter arrives.
- Strip spec fixed: COB, 24V, W/m, CCT matched to the room, CRI 90+, and total length per driver.
- Control decided: which channel each unit is on, which keypad controls it, and which scenes it belongs to.
The supply points belong in the same schedule as the rest of the house. Our electrical points checklist for a new home lists them room by room. The dining room around the unit is covered in living and dining room lighting layers.
How Pert delivers it — a designed solution, not a DIY kit
Pert is a solutions company. We design and install; we do not hand over a roll of strip and a transformer. For built-in lighting that means reviewing the joinery drawings with your interior designer and carpenter before any board is cut; marking placement, groove sizes, cable paths and driver locations on the same drawing the carpenter works from; specifying COB strip, profiles, drivers and CCT to match the room's smart lighting; having our team install and commission the strips, drivers and channels once the joinery is in; and setting scene levels in the finished room with the family, so the crockery unit glows at dinner and switches off with everything else at night.
If you are comparing providers, our guide to the best home automation companies in Hyderabad covers what to check before you sign. How to read a home automation quotation explains how profile lighting should be itemised: metres of strip, profiles, drivers and channels, rather than one lump sum for “cabinet lighting”.
Planning a crockery unit, bookshelf or display wall in Hyderabad? Get the placement, grooves, driver locations and control agreed before the carpenter starts. A change on a drawing costs nothing; a change in finished joinery means rebuilding it. Request a consultation →
Frequently asked questions
Why can I see dots of light on my shelves, and how do I get a smooth line?
Because a bare SMD strip with LEDs 10–17mm apart is too close to a glossy or light surface with no diffuser, so each chip shows as a hotspot and glass or lacquer reflects it again. Use COB strip, which reads as a continuous line, seated in an aluminium profile with an opal diffuser recessed 8–10mm deep. Set the strip 20–30mm back from the shelf's front edge so the source itself is out of sight.
Where should the LED driver for a crockery unit or display cabinet go?
It should go somewhere ventilated and reachable: behind a removable pelmet on top of the unit, in the plinth void behind a clip-on kick board, or in an adjacent service cabinet. Never seal it behind a glued panel, because drivers are the part most likely to fail. Size it so the strip load is no more than about 80% of its rating, and make sure it is dimmable and compatible with the automation channel that controls it.
What colour temperature and wattage should shelf and cabinet lighting be?
For most homes, 2700–3000K matched to the room's other warm lighting, with CRI 90 or above. Use 4.8–6 W/m (about 400–600 lumens per metre) for enclosed shelves and glass cabinets, and 9.6–10 W/m for feature niches and open bookshelves that have to read from across the room. Keep closed glass cabinets at or below about 10 W/m to limit glare and heat, and always make the lighting dimmable.
Can shelf and display cabinet lighting be controlled from a wall keypad and included in scenes?
Yes. Pert groups a unit's shelf lighting onto one dimmable channel and puts it on a Stella wall keypad, either as its own engraved button or inside the room's scenes. Typical starting levels are 60% for Dinner, 40% for Evening, 10–15% for Movie, and off for Good Night and Away. Storage cabinets that are opened rather than displayed are better on a door-contact switch.