
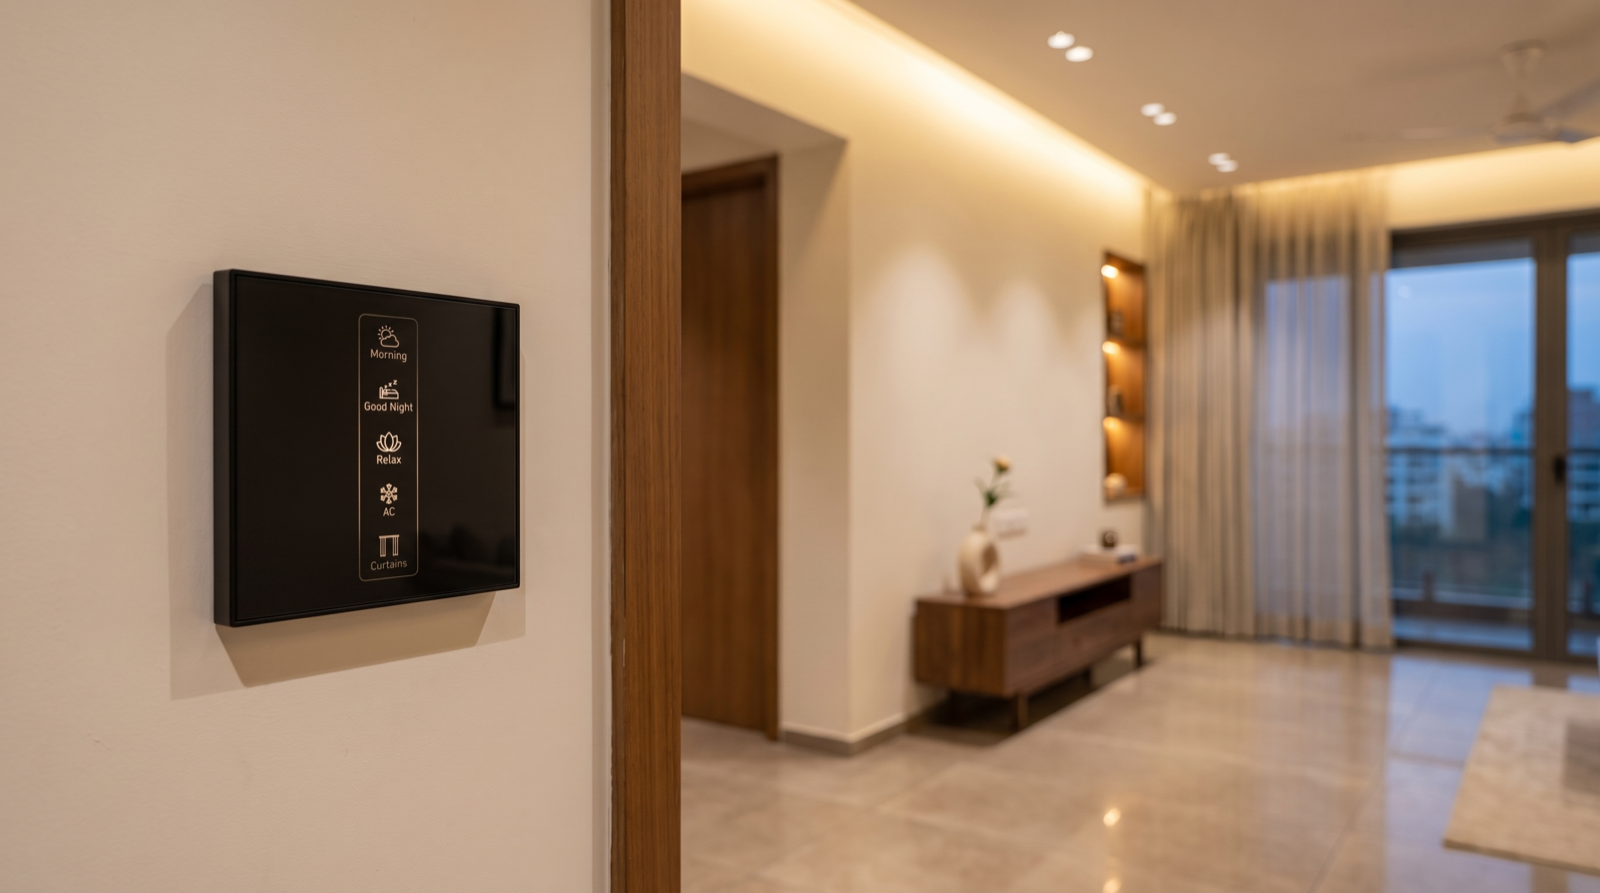
In this guide
- Every button is a promise
- How many buttons per keypad
- Layout order and muscle memory
- Engraving: wording, characters, icons
- A house-wide label vocabulary
- Gang sizes, back-boxes, heights and backlight
- A worked 3BHK keypad & engraving schedule
- Mistakes that cost a new faceplate
- How Pert delivers it (designed, not DIY)
- FAQs
This article is part of our wider coverage of home automation in Hyderabad. Where our guide to keypad placement answers where keypads go, this one answers the harder question that follows: what goes on them.
Every button is a promise
A wall keypad is not a switchboard with nicer graphics. A switch controls a circuit; a keypad button triggers a scene — a saved state across many channels, each at its own level, reached over a chosen fade time. One press of Dinner might take the dining pendant to 55 percent at 2700K, the surrounding downlights to 20, the cove to 35, the artwork spots to 60 and the kitchen general to off, all over a two-second fade.
That is why the label matters more than the hardware. The button is a promise about what the room will look like, and a person makes that promise good by pressing it without thinking. Three consequences follow, and they drive everything else in this guide:
- A button must produce a result, not a state change. Relax should give the same room every time it is pressed, whatever was on before. Buttons that toggle — press once for on, again for off — break that, because the outcome depends on history nobody can see.
- A button must be recallable in the dark. People do not read keypads. They reach for a position they have memorised. Layout stability is worth more than layout cleverness.
- A button must be honest. If Movie also closes the curtains, guests will discover that the first time and expect it forever. Hidden extras are fine; hidden surprises are not.
If any of that sounds like it belongs to the scene design rather than the keypad, that is the point — you cannot plan a keypad before you have written the scenes. Our worked scene examples with real dim levels are the correct starting document, and why scene-based automation beats app-only control explains why the wall button is still the primary interface in a well-designed home.
How many buttons per keypad
The honest answer for almost every position in an Indian home is four to six. Eight is a ceiling, justified only at an entrance. The constraint is human memory, not the module: past six choices people stop reaching for the wall and start opening the app, and a keypad nobody presses is an expensive blank plate.
Working figures we design to:
- Entrance / foyer — 6 buttons (one deliberately left blank). It carries the whole-home actions: an arrival scene, an evening scene, All Off, and typically curtains and a security action.
- Living room — 6 buttons. The room with the most channels needs the most scenes, but still not more than six: Bright, Evening, Movie, Dinner or Guests, Curtains, All Off.
- Bedside — 4 buttons, one pair per side. Reading, Relax, Good Night, All Off. Anything more is pressed wrongly at 2am.
- Bedroom entry — 4 buttons. Bright, Relax, Good Night, All Off — deliberately the same words as the bedside plate.
- Kitchen — 4 buttons. Cooking, General, Night, All Off. Task lighting matters far more than scene variety here.
- Dining — 4 buttons, or none at all if the living keypad is within four or five steps of the table.
- Corridor and staircase — 2 buttons at most, and often zero: these positions should be automated by sensor, with a keypad only as an override.
Notice what that adds up to: a home with 36 dimmable channels is operated day to day through roughly 30 buttons across eight or nine plates. That compression — many channels, few buttons — is the entire value of the control layer. If your keypad schedule starts to approach your channel count, the design has quietly reverted to being a switchboard. The channel side of that arithmetic is covered in how to plan dimmer channels and lighting loads.
Where extra functions should go instead
Every keypad we plan carries more capability than it shows, using press behaviours rather than more buttons. Keep to one hidden behaviour per button and apply it identically across the house:
- Single press — run the scene. Always.
- Press and hold — ramp the dominant channel of that scene up or down, releasing to set the level. This is how a family fine-tunes without an app.
- Double press — a brighter or fuller variant of the same scene, used sparingly and only where it is genuinely wanted.
- Long press on All Off — the whole-floor or whole-home off, as distinct from a single press turning off that room only.
Layout order and muscle memory
On a vertical column of buttons, order is not cosmetic. Two rules make a house learnable in a week:
Rule 1 — brightest at the top, darkest at the bottom. Scenes should descend in light level down the plate: Bright, Evening, Relax, Good Night. The hand learns that lower means darker, and it becomes correct in every room without anybody being taught.
Rule 2 — All Off is always the bottom button, on every keypad in the house, without exception. This is the single highest-value convention available, because it is the button people press in a hurry, in the dark, in a room they do not live in. Guests find it. Children find it. Housekeeping finds it. Make it the bottom position and never move it, even on a plate where it forces an otherwise awkward order.
After those two, group by kind: lighting scenes together in the upper block, then non-lighting actions — curtains, AC, a security arm-away action — in a lower block just above All Off. Do not interleave a curtain button between two lighting scenes; the pause it causes while somebody re-reads the plate is exactly what good layout eliminates.
Where a room has more than one entrance, both plates must carry the same buttons in the same order, even if one of them consequently holds a button that position hardly needs. Two doors into a living room with mirrored layouts is a bug that surfaces every day for a decade.
Engraving: wording, characters, icons
Engraving is a physical process. The wording is laser-cut into the faceplate before it ships, and the backlight shows through the cut. That has practical limits worth designing to rather than discovering:
- Ten to twelve characters per line, two lines maximum, and one line is far better. Good Night fits. Goodnight Scene is set smaller and reads worse in the dark, which is the only time it matters.
- One word wherever the language allows. Morning. Reading. Dinner. Movie. Relax. Away. The exceptions that earn a second word are Good Night and All Off.
- Title case, no full stops, no ampersands. Ampersands and slashes engrave as visual noise at 3mm type.
- A small line icon beside the text, not instead of it. A 4 to 5mm icon helps a returning guest scan the plate, but an icon-only keypad is a guessing game — there is no universally understood glyph for Dinner. Use icons only where the meaning is unambiguous: a curtain, a fan, a moon, a power symbol.
- English throughout, in one script. Mixed-script plates look considered on a drawing and cluttered on a wall, and the type sizes rarely balance.
Two wording traps are worth naming because we see both regularly. The first is labelling by circuit — Light 1, Light 2, Cove, Zone B. These describe the wiring, and they force everyone in the house to hold a mental map of the electrical drawing. The second is labelling by furniture or occupant — Ravi's Room, TV Wall. Rooms change occupants and televisions move; the label outlives both, and correcting it means a new plate.
A house-wide label vocabulary
Decide the words once, for the whole home, and use them everywhere. A fixed vocabulary is what allows somebody to walk into an unfamiliar room in your house and operate it correctly on the first press. A workable set for a Hyderabad home:
- Morning — cool, bright, high-CCT wake-up light.
- Bright — full working light, for cleaning and daytime use.
- Reading — focused task light with a low ambient surround.
- Relax — warm, low, evening ambience.
- Dinner — the table lit, the surround dropped back.
- Movie — near-dark with a low cove and any screen-adjacent light off.
- Night — a 5 to 10 percent path-light level for moving around after midnight.
- Good Night — the going-to-bed action for that room.
- Away — everything off, curtains closed, security armed.
- All Off — that room off, bottom button, every plate.
- Curtains — open on press, close on second press, or a hold to stop mid-travel.
Eleven words cover an entire house. No plate uses more than six of them, but every plate draws from the same list, and no idea appears under two different names anywhere in the home. Write this vocabulary into the drawing set before any plate is ordered, and hand the same sheet to whoever configures the system so the app's names match the engraving exactly — a scene called Evening in the app and Relax on the wall is a support call waiting to happen. Whether your household needs the app at all is worth deciding early: see app, wall keypad, or both.
Gang sizes, back-boxes, heights and backlight
This is the section to give your electrician, ideally as a marked-up drawing before plastering.
Back-boxes and gang sizes
- A square Stella keypad mounts on a standard modular back-box — plan a 3M or 4M box, and confirm the exact size against the specified plate before the boxes are set, since a plate ordered against the wrong box means a chased wall.
- Box depth 45 to 50mm, in masonry not in a hollow partition where possible, so the module and its terminations sit without strain on the conductors.
- The box must finish flush with the final wall surface. Tile, veneer, cladding or panelling thickness has to be known when the box is set; a box fixed to bare brick before 8 to 10mm of tile leaves the plate sitting in a well.
- Level to within about 1mm across the plate. A keypad is a plain geometric object on a bare wall, and a degree of tilt that would pass unnoticed on a switchboard is obvious on it.
- A neutral at every keypad back-box. Keypads need permanent power to stay live and backlit while the lights are off. This is the same requirement that governs switchboards, and the same one that is ruinous to add late.
- Do not gang three plates side by side. Two adjacent plates is already a sign the scene list needs consolidating; the answer to more functions is better scenes, not a wall of glass.
Heights
- Entrance and room keypads: centre of plate 1,150 to 1,250mm above finished floor, aligned to the switchboard line used elsewhere in the home.
- 100 to 150mm clear of the door architrave, on the handle side, never behind the door's swing.
- Bedside keypads: 600 to 750mm above finished floor, and 100 to 150mm in from the edge of the mattress — reachable by a hand from the pillow, not requiring somebody to sit up.
- Kitchen keypads: about 1,250mm, above the backsplash and clear of the wet zone around the sink and hob.
- Where a household includes a wheelchair user or elderly parents, drop entry keypads to about 1,000mm and keep them consistent throughout.
Backlight and feedback
Backlight is a comfort setting, not a brightness contest. Set the standby glow to a level that lets you find the plate in a dark corridor without lighting the room — typically 5 to 10 percent at night with a brighter daytime level, on a schedule. In bedrooms, take the standby level lower still or off after the Good Night scene runs, because a glowing plate opposite a bed is a complaint we hear far more often than any functional fault. Confirm at commissioning that each press gives a visible acknowledgement, so nobody presses twice and lands in the double-press variant by accident.
A worked 3BHK keypad & engraving schedule
A representative 1,600 sq ft three-bedroom flat. This is the format the schedule should take — position, height, button count and the exact engraved words, top to bottom.
- Entrance, 1,200mm, 6 buttons: Morning · Evening · Curtains · Away · [blank] · All Off. The blank is intentional; it becomes the button the household discovers it wants in year one.
- Living room (main door side), 1,200mm, 6 buttons: Bright · Evening · Relax · Movie · Curtains · All Off.
- Living room (corridor side), 1,200mm, 6 buttons: identical wording and order to the plate above.
- Dining, 1,200mm, 4 buttons: Bright · Dinner · Relax · All Off. The scene levels behind these come from planning living and dining lighting layers.
- Kitchen, 1,250mm, 4 buttons: Cooking · Bright · Night · All Off.
- Master bedroom entry, 1,200mm, 4 buttons: Bright · Relax · Good Night · All Off.
- Master bedside, left and right, 700mm, 4 buttons each: Reading · Relax · Good Night · All Off. Each side's Reading button drives only that side's bedside channel.
- Bedroom 2 and Bedroom 3 entry, 1,200mm, 4 buttons each: Bright · Relax · Good Night · All Off.
- Corridor, 1,200mm, 2 buttons: Night · All Off — an override only; normal corridor behaviour is by sensor.
Total: 10 plates, 44 buttons, drawn from an 11-word vocabulary, operating roughly 36 dimming channels, motorised curtains across five windows and the security system. Every plate has All Off at the bottom; every bedroom uses the same four words; no label anywhere refers to a circuit, a zone, a room number or a person.
Mistakes that cost a new faceplate
- Deciding engraving after the plates are ordered. Lock the schedule three to four weeks before handover; replacement plates typically take two to three weeks to manufacture, and a late change means living with masking tape over a wrong label.
- Engraving a scene that has not been designed. If nobody has written what Evening does at channel level, the label is a guess and will be re-cut.
- Letting the app and the plate diverge. Same names, both places, decided once.
- Filling every button. Leave one blank at the entrance and living positions. It is the cheapest option you will ever buy.
- Making the buttons per-fixture. A plate reading Cove · Spots · Pendant · Strip is a switchboard in an expensive faceplate, and it obliges the household to do the design work every evening.
- Ignoring who else uses the room. Housekeeping, guests and grandparents will use these buttons, and none of them will be given a tutorial.
- Signing off the layout on paper only. Ask for a full-size printed plate mock-up taped in position on the wall before engraving is released — five minutes standing in the room settles arguments that a PDF cannot.
How Pert delivers it — a designed solution, not a DIY kit
Pert is a solutions company: we design and install. For keypads that means the engraving schedule is a drawing we produce, not a form we send you to fill in. We start from the scene list, derive the button count for each position, fix the vocabulary across the whole home, and issue a keypad schedule showing every plate with its position, mounting height, gang size, back-box requirement and the exact engraved wording top to bottom. That drawing goes to the electrician before plastering — so the boxes are set at the right heights, flush with the finished surface, with a neutral at each one — and to the interior contractor, so no plate ends up behind a wardrobe or a door swing.
Before engraving is released we tape a full-size mock-up of each plate in its final position and walk the home with you, because the wording that reads well on a screen sometimes reads oddly on the wall. We supply and install the Stella wall keypads alongside the tunable and dimmable COB, strip and spot lighting, motorised curtain tracks and motors and security hardware, then commission the scenes behind the buttons after dark with the real fixtures in place, and return to re-tune them once the household has lived with the home for a few weeks. If you are comparing providers, ask to see a keypad and engraving schedule from a completed project — it is one of the fastest ways to tell a designer from a reseller, and our guide to the best home automation companies in Hyderabad covers the rest of what to check before you sign.
Building or renovating in Hyderabad? Keypad heights, back-boxes and neutrals have to be settled before plastering, and the engraved wording three to four weeks before handover — both come from your scene list, not from a switchboard drawing. Request a consultation →
Frequently asked questions
How many buttons should a smart home keypad have?
Four to six for almost every position in a home, with eight as an absolute ceiling and only at the entrance. The limit is not the hardware, it is recall: a person walking into a dark room does not read a wall panel, they press the button their hand already knows, and that only works while the layout is small and stable enough to memorise. Past six buttons people stop reaching for the keypad at all and start using the app instead, which defeats the purpose of putting a keypad there. The right way to arrive at the number is to write the scenes first and count them — a bedside position genuinely needs four (Reading, Relax, Good Night, All Off), a living room six, an entrance six with one left blank for whatever the house asks for in its second year. If a room appears to need ten buttons, the scenes are wrong, not the keypad: two similar scenes should be merged, or a rarely used function moved to the app where it costs nothing to hide.
What should keypad engraving say — scene names or room names?
Scene names, in the household's own words, describing the moment rather than the machinery. Morning, Reading, Dinner, Movie, Relax, Good Night and All Off tell a guest what will happen when they press; Light 1, Circuit 3, Cove or Zone B describe the wiring and mean nothing to anybody who did not install it. Keep each label to one word where possible and no more than about ten to twelve characters per line, because the engraved area on a button is small and a long label has to be set in a type size that is unreadable in low light — which is exactly when keypads are used. Use the same word for the same idea in every room in the house: if the bedroom button says Good Night, the entrance button must not say Goodnight or Sleep. And avoid labels that go stale, such as a person's name or a brand of television, because changing an engraved label means manufacturing a new faceplate.
At what height should a wall keypad be installed?
Entrance and room keypads sit with the centre of the plate at about 1,150 to 1,250mm above finished floor level, matching the switchboard line used through the rest of the home so the wall reads as deliberate rather than assorted. Keep the plate 100 to 150mm clear of a door architrave, on the handle side of the door, and never behind the swing of an opened door. Bedside keypads are the exception and should sit much lower, at roughly 600 to 750mm above finished floor, which puts them within reach of a hand resting on the mattress rather than requiring somebody to sit up in the dark. Kitchen keypads go above the counter backsplash at about 1,250mm and clear of the wet zone around the sink. In every case the back-box must finish flush with the final wall surface, so the tile, cladding or panelling thickness has to be known before the box is set — a box fixed to bare brickwork ends up 8 to 10mm recessed once the tiling is done.
Can keypad button labels be changed later?
What the button does can be changed in software at any time; what the button says cannot. Engraving is a manufacturing step performed on the faceplate before it ships, so a change of wording means ordering a replacement plate and waiting for its lead time, typically two to three weeks. That is why we lock engraving schedules about three to four weeks before handover and why we deliberately leave one blank button on the entrance and living keypads: houses discover a scene they did not know they wanted in their first year, and a blank button lets that scene be added with a single plate swap rather than a redesign. The underlying scene behind an existing label — which channels it touches, at what levels, over what fade time — is tuned at commissioning and re-tuned free of charge later, so it is worth choosing labels that describe the moment rather than the settings, since only the settings are cheap to change.