
In this guide
An entrance has to do four unrelated jobs in about two square metres. It has to let you find a keyhole in the dark, show a stranger's face clearly, hold a mirror you actually use before you leave, and give a guest a first impression of the house. Those four jobs need different light at different heights at different times, which is exactly why a single ceiling point on a single switch never works. This article is part of our wider coverage of home automation in Hyderabad, and it deals with the one room where a good system announces itself in the first three seconds.
Why foyers get under-planned
Five things go wrong repeatedly, and all of them are decided on a drawing months before anyone notices.
- One light, one switch. The foyer gets a single circuit, so the level that is right for greeting guests at 8pm is the same level that blinds you at 1am. Every other room in a planned home gets layers; the entrance rarely does.
- The switch is behind the door leaf. An open door hides the switchboard on the hinge side, so people reach around it in the dark. The plate belongs on the latch side, on the wall you face as you walk in.
- The console and mirror arrive after the ceiling closes. Foyer joinery is nearly always finalised late. A downlight placed on a symmetrical grid ends up 400mm off the centre of the console, and the mirror is lit from directly overhead, which puts your own face in shadow.
- The feature wall is lit by accident. The client pays for fluted teak or stone cladding at the entrance, and it is lit by a general downlight 1500mm away that barely touches it.
- Nothing connects to leaving the house. The entrance is the natural place to turn everything else off, arm security and close the curtains, and in most homes it does none of that because no one asked for a scene point at the door.
The good news is that the foyer is small, so fixing all five is cheap. It usually amounts to three dimmable circuits, one keypad box and about four dimensions on a drawing.
The numbers: lux, heights and setbacks
These are the figures worth writing on the drawing rather than leaving to the site electrician.
- General foyer level: 100-150 lux on the floor in the evening. This is a circulation space, not a work space — brighter than this reads as a lobby, not a home.
- Console and mirror task zone: 200-300 lux, and importantly measured vertically at face height, not on the floor. Light that only comes from directly above will light your scalp and shadow your eyes.
- Outside the main door: 50-100 lux at the lock. Enough to find a keyhole and to see a visitor's face and the camera image clearly, without a floodlight aimed at the corridor.
- Night level: 5-10% of the general circuit. This is the level a foyer should return to for a 1am arrival, and it is the single most appreciated setting in the whole entrance.
- Downlight setback: 600-750mm from the finished wall face on a 10ft ceiling, spaced 1.2-1.5m on centre in a typical 1.2-2.4m wide apartment foyer. In a villa entrance of 2.5-4m, treat it as a small room and follow the same geometry as downlight spacing and beam angles.
- Mirror lighting: 1800-1900mm to the centre of the light source if you are lighting a full-height entrance mirror from the sides, or a soft wash from a downlight set 400-500mm in front of the mirror face rather than directly above it.
- Console accent: a narrow 15-24° spot aimed at roughly 30° from vertical, landing on the console top or the art above it — the same rule covered in wall washing and accent lighting.
- Feature wall graze: 100-250mm setback if the entrance wall is fluted, stone or textured; a 600-900mm wash if it is smooth and painted. Getting this backwards is the most common foyer mistake we see.
- Shoe cabinet and niche strips: 12V or 24V strip behind a 25-40mm front lip, driven from a driver mounted outside the joinery at an accessible point.
- CCT: 2700K throughout the foyer, with the mirror zone no cooler than 3000K and at CRI 90+ so skin tones and fabric colours read correctly before you walk out of the door. Our colour temperature guide works through the logic room by room.
The four layers of a foyer
Even in two square metres, a foyer needs separate, individually dimmable groups. Ganging them onto one channel is what forces every compromise later.
1. Ambient
Two to four recessed downlights, or a single decorative pendant plus two downlights in a villa entrance with a double-height void. This is the layer that carries the 100-150 lux and the 5-10% night level. If the entrance sits under a high void, the fixture selection and maintenance access change completely.
2. Feature or accent
The wall the client actually paid for: fluted panelling, stone cladding, a nameplate niche, or artwork above the console. On its own dimmable channel, this is the circuit that does the heavy lifting in the Welcome scene — it goes to 100% while the ambient sits at 60%, and the entrance instantly looks designed rather than lit.
3. Task
The console top, the mirror and the inside of the shoe cabinet. Small loads, high value. A door-triggered strip inside the shoe cabinet or wardrobe costs very little and is the kind of detail people mention to guests, and the same strip-and-lip logic appears in wardrobe and walk-in closet lighting.
4. Low-level night
Either the ambient circuit held at 5-10%, or a dedicated skirting or step light on a separate channel. In villas with a staircase off the foyer, this is the layer that continues up as the night path — see staircase and corridor lighting with motion sensors.
All four layers should be dimmable, tunable smart lighting on separate channels. Four channels in a foyer sounds excessive until you try to build a Welcome scene with two.
The entry keypad: height, wall and buttons
The entrance keypad is the most-used control point in the whole house, and it is the one most often placed badly.
- Height: 1200mm above finished floor to the centre of the plate. This matches standard switchboard height in Indian homes and falls naturally under a standing adult's hand.
- Wall: latch side, not hinge side. 150-300mm clear of the door architrave, on the surface you face as the door opens. A keypad behind the open leaf is a keypad nobody uses.
- Clearance: 200mm of free wall around it. Confirm the console, shoe cabinet and mirror positions with the interior designer before fixing the box, because foyer joinery is always finalised late and always grows.
- Video door phone above it, screen centre at about 1500mm — eye level for the screen, hand level for the keypad, on the same wall so there is one place to deal with the door.
- Button count: four to six. The entrance is where restraint pays. Two arrival scenes, two departure scenes and one light group is a better keypad than ten buttons nobody can remember.
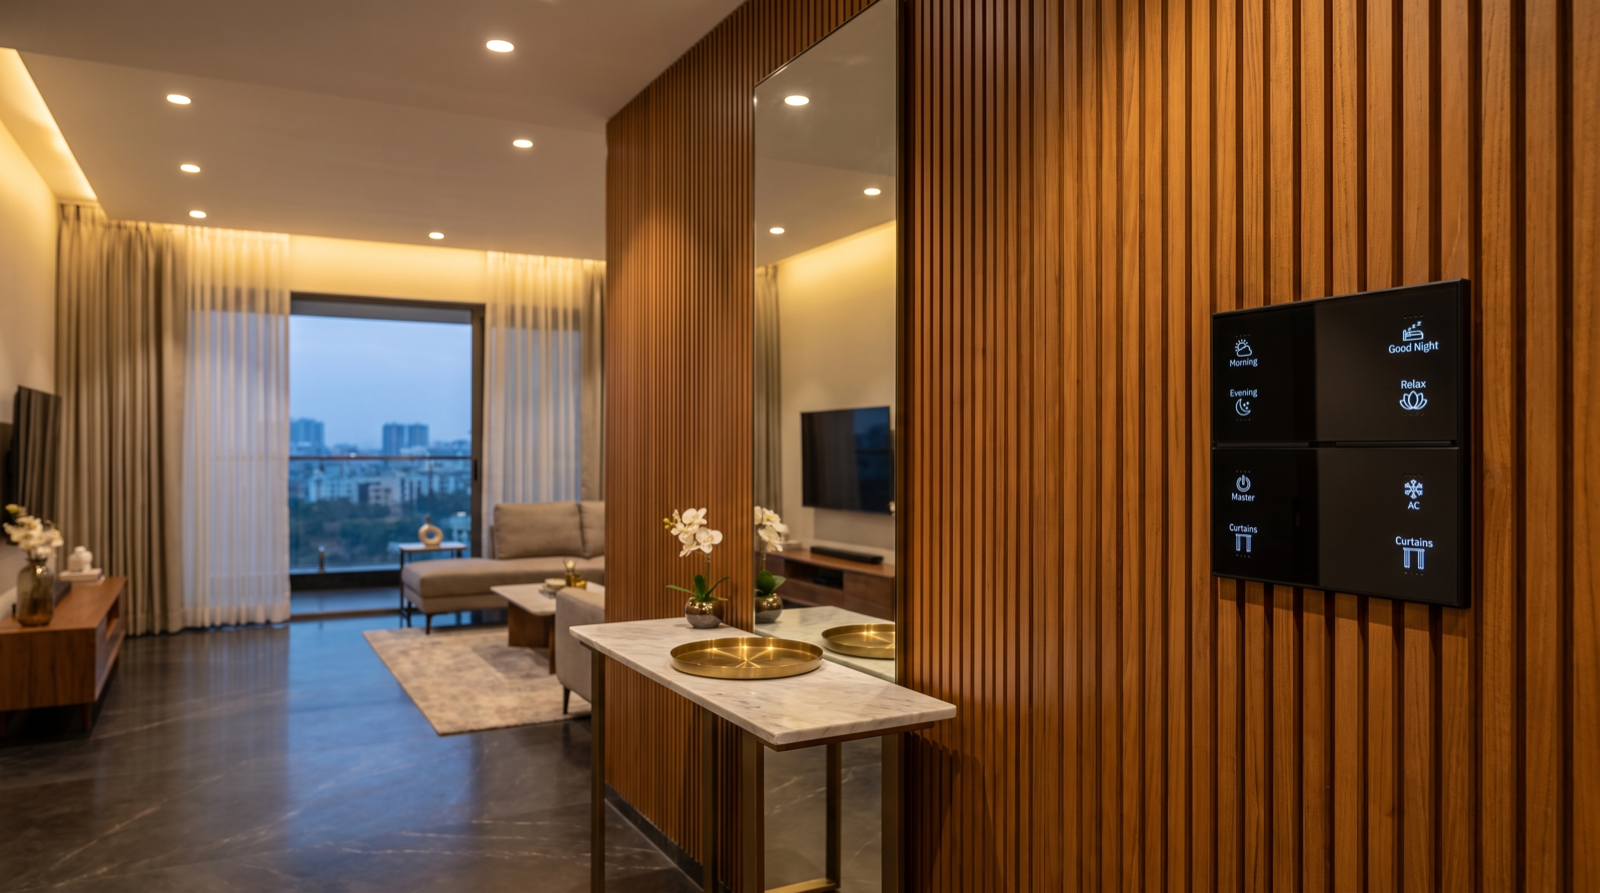
On engraving, label scenes by intent rather than by circuit: Welcome, Foyer, Away, Good Night, Curtains. "Foyer Cove 2" means nothing to a guest or to a parent. Getting button counts, gang sizes and label wording right is a whole discipline of its own, covered in keypad layouts and engraving, and where every keypad in the home should go is set out in how to plan keypads in a home. Our Stella wall keypads are what these scenes actually sit on.
Arrival and departure scenes with real levels
The foyer is the only place in the house where a single button press should change the state of rooms you cannot see. These are the four scenes we build most often, with the levels we actually commission them at.
- Welcome — foyer ambient 60%, feature wall 100%, console accent 100%, living room ambient 40%, living cove 30%. Security's internal zones disarm. After sunset it fires warm at 2700K; before sunset it does very little, because a bright foyer at 3pm is wasted energy. The effect from the doorway is a house that already looks lived in.
- Late Night — foyer ambient 8%, everything else off. Triggered by the same Welcome button when the time is after about 11pm, or by a dedicated press. Enough to cross the foyer and hang up keys without waking anyone or resetting your own night vision.
- Away — all lighting off across the home, motorised curtains closed, security armed with a 30-60 second exit delay so you can actually get out of the door. This is the button that saves the most electricity in the whole system, because it turns off the lights nobody remembered.
- Good Night — foyer to 0%, ground floor off, bedroom path lights at 5%, curtains closed, perimeter armed. Pressed at the entrance on the way to bed rather than from a phone.
Two refinements worth building in. First, make Welcome time-aware rather than fixed — the same press should behave differently at 6pm and at 1am, and an astro schedule tied to Hyderabad's sunset handles that without anyone setting a clock. Second, give the foyer a gentle fade: a 1-2 second ramp on arrival feels considered, while an instant snap to 60% feels like a switch. Full worked examples with levels for every room are in how to design home automation scenes, and the case for putting these on a wall rather than in an app is in why scene-based automation beats app-only devices.
The door, the camera and the sensors
The entrance is where lighting and home security genuinely overlap, and planning them together costs nothing extra at the wiring stage.
- A magnetic contact on the main door frame is the cheapest sensor in the house and the most useful. It is what lets the door itself trigger the foyer light, and what tells you the door was left open.
- The door camera at 2.4-2.7m with roughly 15-20° of downtilt, positioned so the visitor's face is lit by your entrance light rather than backlit by the corridor behind them. A camera aimed into a bright lobby records silhouettes. Heights, angles and coverage for the rest of the home are in CCTV camera and sensor placement.
- A ceiling PIR or presence sensor at 2.7m covers roughly a 5m diameter — more than enough for an apartment foyer. Set a 2-3 minute timeout and a lux threshold so it does nothing during the day.
- Keep the exit path lit on an alarm event. If security triggers at night, the foyer and path lights should come up to 100%, not stay dark. This is a scene decision, not a product feature.
How locks, cameras and sensors should work as one system rather than four apps is covered in smart home security in Hyderabad.
Pre-plaster wiring checklist
If your walls are still open, this is the list to hand to your electrician and interior designer.
- A keypad box on the latch-side wall at 1200mm AFF, with 200mm of clear wall confirmed against the final joinery drawing.
- A conduit and box for the video door phone above it, screen centre at about 1500mm.
- Separate dimmable circuits for ambient, feature/accent, task and low-level night — four channels, not one.
- A neutral wire at the entry point. Retrofitting one into a finished foyer means chasing the wall everyone looks at.
- Setbacks dimensioned from the finished wall face — stone cladding and panelling add 40-75mm, which turns a 150mm graze into 90mm.
- Console, mirror and shoe cabinet positions frozen before the false ceiling closes, so the accent spots land on furniture that actually exists.
- Driver locations marked outside the joinery at a named, accessible service point, with an access panel where the ceiling is closed.
- A magnetic contact provision on the main door frame, and a camera point outside at 2.4-2.7m.
- An outside light on its own circuit so the lock area can be lit without lighting the whole foyer.
- Ceiling sensor point in the middle of the foyer if you want automatic arrival lighting.
If you are working through the whole home rather than one room, how to plan smart lighting for a new home is the wider sequence, and living and dining room lighting layers covers the space your Welcome scene opens onto.
How Pert delivers it — a designed solution, not a DIY kit
Pert is a solutions company: we design and install, we do not hand over a box of parts and a manual. For an entrance that means a site visit to measure the actual foyer and confirm the door swing, the finished wall materials and the joinery layout; a lighting and control drawing that dimensions setbacks, keypad height and circuit grouping on the same sheet your electrician and ceiling contractor work from; coordination with your interior designer before the console and mirror are made, because those two pieces decide where the light goes; professional installation and aiming; and then scene commissioning done in the finished foyer after dark, with the furniture in place.
That last step is where an entrance is won or lost. A Welcome scene tuned on a spreadsheet is a set of numbers; a Welcome scene tuned at 8pm in the actual room, with the mirror up and the veneer installed, is the thing people remember about the house. If you are adding this during a renovation instead of new construction, read can you add home automation during renovation in Hyderabad, and if you are still comparing providers, our guide to the best home automation companies in Hyderabad covers what to check before you sign.
Planning the entrance of a new home in Hyderabad? Get the keypad wall, the circuit split and the arrival scenes designed before the plaster goes on and the console is built — the foyer is the cheapest room to get right and the most expensive one to repair. Request a consultation →
Frequently asked questions
How bright should an entrance foyer be?
Plan for about 100-150 lux of general light on the foyer floor in the evening, rising to roughly 200-300 lux at the console or mirror task zone, and 50-100 lux at the lock outside the main door. These are evening figures, not maximums — the same foyer should be able to sit at 5-10% for a 1am arrival, which is why every foyer circuit should be dimmable rather than a plain on-off switch.
At what height should a keypad be installed near the main door?
1200mm above finished floor to the centre of the plate, on the latch side of the door and 150-300mm clear of the architrave, on the wall you face as the door opens rather than behind the leaf. Leave 200mm of clear wall around it so the console, shoe cabinet or mirror does not later block it, and if the video door phone shares the wall, put it above with the screen centre at about 1500mm.
What should a Welcome scene actually do?
More than switch a light on. A typical one brings the foyer ambient to 60%, the feature wall and console accent to 100%, the living room ambient to 40% and the cove to 30%, disarms internal security zones and leaves the rest of the house off — so the home reads as warm and occupied from the doorway. It fires warm at 2700K after sunset and does very little during the day, and it lives on a keypad beside the door so it works with an armful of shopping.
Do I need to plan foyer automation before construction?
It is much cheaper and cleaner if you do, because almost every foyer decision is a wiring decision: a keypad box at 1200mm on the right wall, separate dimmable circuits, a neutral at the entry point, a video door phone conduit, a driver location outside the joinery, and a contact on the door frame. Adding these later means chasing the one wall finished in stone, veneer or mirror. A wireless retrofit is still possible and we do it regularly, but before plaster is the ideal moment.